マージン・パディング・ボーダーの使用例
以下の例は、マージン、パディング、ボーダーがどのように相互作用するかを示すサンプルです。
<!DOCTYPE HTML PUBLIC "-//W3C//DTD HTML 4.01//EN">
<HTML>
  <HEAD>
    <TITLE>Examples of margins, padding, and borders</TITLE>
    <STYLE type="text/css">
      UL {
        background: yellow;
        margin: 12px 12px 12px 12px;
        padding: 3px 3px 3px 3px;
                                     /* No borders set */
      }
      LI {
        color: white;                /* text color is white */
        background: blue;            /* Content, padding will be blue */
        margin: 12px 12px 12px 12px;
        padding: 12px 0px 12px 12px; /* Note 0px padding right */
        list-style: none             /* no glyphs before a list item */
                                     /* No borders set */
      }
      LI.withborder {
        border-style: dashed;
        border-width: medium;        /* sets border width on all sides */
        border-color: lime;
      }
    </STYLE>
  </HEAD>
  <BODY>
    <UL>
      <LI>リストの最初の要素 要素の文字列が長い場合は折り返します
      <LI class="withborder">リストの2番目の要素 要素の文字列が長い場合は折り返します</UL>
  </BODY>
</HTML>
上記のHTMLは、次のように表示されます。
- リストの最初の要素 要素の文字列が長い場合は折り返します
- リストの2番目の要素 要素の文字列が長い場合は折り返します
このサンプルのBODY要素内には1つのUL要素があり、その中に2つのLI要素があります。最初のLI要素はクラス指定がありませんが、2番目のLI要素はwithborderクラスとして作られています。これらの要素のスタイルはHEAD要素内のスタイルシートによって、次のように定義されています。
UL {
  background: yellow;
  margin: 12px 12px 12px 12px;
  padding: 3px 3px 3px 3px;
}
LI {
  color: white;                /* text color is white */
  background: blue;            /* Content, padding will be blue */
  margin: 12px 12px 12px 12px;
  padding: 12px 0px 12px 12px; /* Note 0px padding right */
  list-style: none             /* no glyphs before a list item */
                               /* No borders set */
}
LI.withborder {
  border-style: dashed;
  border-width: medium;        /* sets border width on all sides */
  border-color: lime;
}
| 要素 | テキストカラー | 背景 | マージン | ボーダー | パディング | list-style |
|---|---|---|---|---|---|---|
| UL | undefined | yellow | すべて12px | undefined | すべて3px | undefined |
| LI | white | blue | すべて12px | undefined | 上=12px,右=0px,下=12px,左=12px | none |
| LI.withborder | undefined | undefined | undefined | border-style: dashed; border-width: medium; border-color: lime; | undefined | undefined |
上記の設定により、UL要素とLI要素は次のように配置されます。
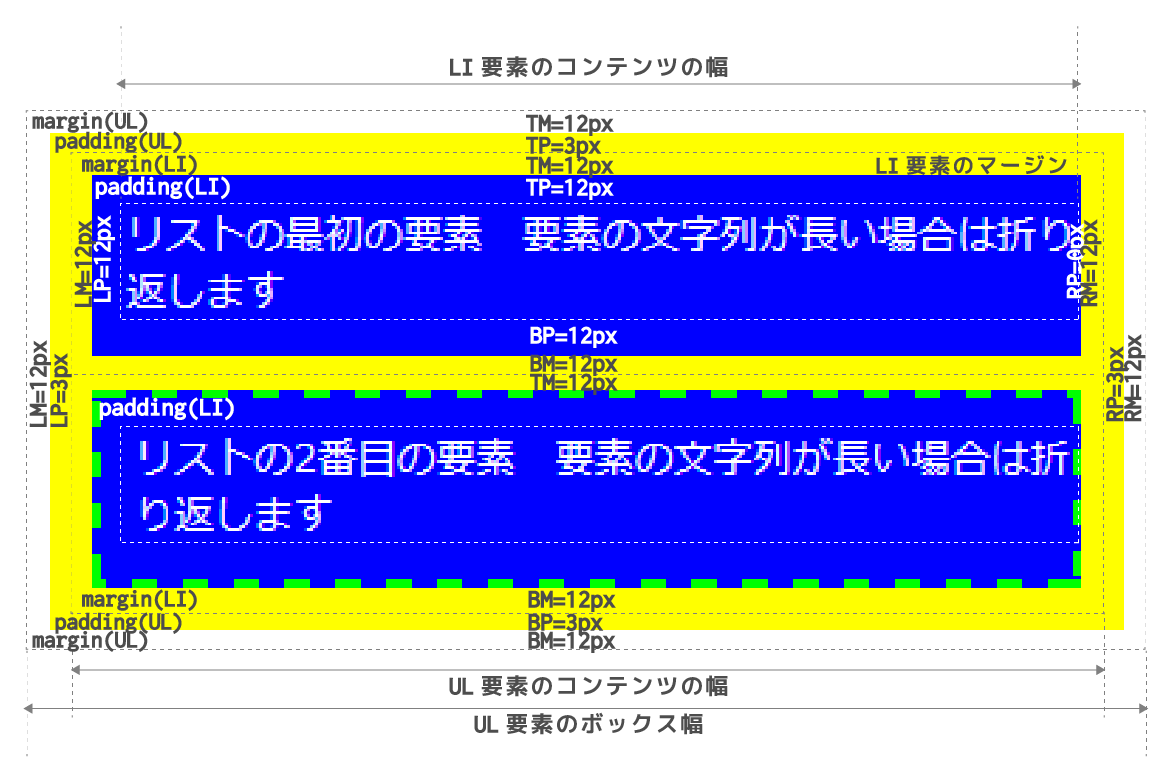
それぞれのLIボックスのマージンボックスの高さは、① コンテンツの高さ、② 上下のパディング、③ 枠線、④ マージンを加えたものになります。
